Tuesday, December 21, 2010

Renee’s Garden Holiday Party - A Wealth of Wreaths

The office staff of Renee’s Garden recently spent a cozy afternoon together making holiday wreaths at our 2010 holiday party. Our horticulturalist, Beth Benjamin, hosted us at Camp Joy Gardens in Boulder Creek, CA, where she is a founder and current board member. We enjoyed homemade soup in the kitchen, exchanged gifts and then spent the afternoon creating our wreaths from a multicolor array of dried flowers and herbs that Beth selected from the harvest at Camp Joy. It was a nice break for all of us and fun to see the creativity that each person brought to their wreath designs.

Before we sat down to lunch, Beth took us on a tour of the farm. Renee's Garden has a special connection to Camp Joy – they grow the seed for our delicious Camp Joy Cherry Tomatoes! As we toured the gardens it was easy to envision the bounty produced in the height of the harvest. Even in the middle of December there were crops of greens in the ground, persimmons hanging on the trees and honey being processed in the barn. The goats were happy to see us and gobbled up the Kohlrabi greens offered as treats.
Camp Joy is a non-profit organic farm that sustains itself thru a CSA and sales of its products to local stores and the community. They are particularly known for the beautiful dried flower wreaths made from flowers grown and dried throughout the summer. In existence for 40 years, Camp Joy has apprenticed many successful farmers and taught generations of kids about the wonders of gardening. Their website is http://www.campjoygardens.org/
The main farmhouse showcases the bounty of the garden and we all admired the craftsmanship of the wreaths displayed on the wall. It was a damp day outside, but inside the wood fired stove pumped out warmth all afternoon. At the end of the day we were all pleased with our handiwork and a fine holiday get together.

Wednesday, November 17, 2010

Sowing Renee's Scatter Gardens

- by Lindsay Del Carlo, Trial Garden Manager
Here in our trial garden in central California, the fall rains have begun. Our climate (UDSA zone 8) is mild and, although we have had hard frost, the ground does not freeze in the winter.  Many flowers that had gone to seed from last season have now started to germinate once again. This is a good indication that it is a great time to sow spring blooming flowers, as the acidity of the rain water helps the seeds to germinate. The plants will grow through the winter and burst into bloom in the spring. It is a great time to sow a canister of Renee’s Scatter Garden seeds.  NOTE: In cold winter climate areas, you can sow seeds in early spring as soon as the soil can be worked.

We have prepared our planting bed. The soil was first weeded and then turned with a digging fork. All of the big clumps were broken up, and the soil raked flat.
 
 Before opening the canister, shake it thoroughly to evenly mix the seeds with the rice hulls. Then open up the can, peel back the aluminum seal, and pour some of the mixture into your hand and start to scatter it.

Make sure to shake out the seed mixture thinly and evenly. Scatter the seeds giving them enough space so that they do not germinate in crowded clumps. This will only stunt the growth of the plants. The rice hulls are easy to see and a good indicator of how far apart the seed has been sown.


After scattering the seed mixture, use a rigid rake to work the seeds down into the soil to a depth of 1/4 inch. Then, water the seeds in thoroughly and evenly with a fine mist sprayer. Keep the seeds evenly moist while they are germinating.


Next spring, you will enjoy a lovely carpet of colorful flowers.
Annual Wildflowers
 

Endles Bouquet Cut Flowers
Pollinator Flowers
California Orange Poppies
 
Cover Crop Blend


Tuesday, October 26, 2010

Jack's Carrots

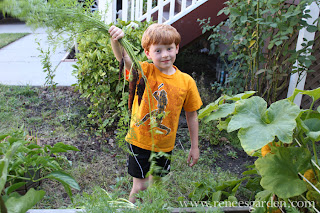
Carrots are always one of the most fun vegetables for kids to grow themselves. Here's proof of that from Cheri, our Renee's Garden Accounting Manager, who describes how her young son Jack grew his own this season:
Last year my 5 year old son Jack fell in love with the purple carrots (and many of the other vegetables) that were tested in the Renee’s Garden trial gardens. So, this summer he decided to grow his own carrots--not only the purple ones he loves so much, but also the yellow and orange carrots from Renee’s Sunshine Mix and even the adorable little Round Romeo carrots. Unfortunately we planted the Mini Jack pumpkins (he had to plant those of course!) too close to the carrots and we lost the Round Romeos under the pumpkin plants. However, Jack had great success with the other three varieties and they have made him into a confirmed vegetable lover.

The process started in early June with Jack and his 2 year old sister, Jenni, preparing the raised bed in our front yard. They weeded the bed and then raked in the new soil. Jack then carefully scattered the carrot seeds in rows. I then thinned out the carrot seedlings a couple times during the summer: Jack wanted nothing to do with “throwing away” his yummy carrot plants! After checking them constantly and excitedly throughout the summer, Jack finally began the best part: harvesting his carrots in late August (unusually cool weather and a lack of warm sunshine lengthened the growing period).

Jack has since pulled and enjoyed a couple of full-grown carrots every few days. The longer they’re in the ground, the bigger and sweeter they’ve become. He has harvested some truly amazing carrots. One was nearly as tall as he was from the tips of the greens to the bottom of the carrot! He had another that looked as if it was tie-died purple and orange.

Jack has had so much fun sharing his crop with the neighbor kids (who have watched the progress all summer) and showing the carrots off to his friends at school. While he says all the carrots are “super yummy”, his favorites are the purple ones. He loves to show the other kids how good they are because none of them had never seen a purple carrot before. Once Jack has harvested the last of the carrots, he’s going to start all over again and plant a fall crop of the same varieties. This time the pumpkin plants won’t interfere with the Round Romeos!


Thursday, October 14, 2010

Announcing the 2010 Renee’s Garden Photo Contest Winners

Congratulations to the winners of the 7th Annual Renee's Garden Photo Contest. Thanks to everyone who sent in photos for our contest - we had so many beautiful entries it was very difficult to choose just a few winners.  We enjoyed seeing them all. To see more of our favorite photo entries (and download them as desktop wallpapers), view our Flickr photo gallery. To view last year's winners, click here.

1st Place Winner:  “Chianti Rose Tomatoes
susy_morris_chianti_rose_toSusy Morris,
Malvern, OH  
 "I've been enjoying growing things in the garden from your seeds for the first time this year." Susy's gardening blog, Chiot’s Run,  documents her life, cooking, travels, photography, and cats.

2nd Place Winner:   “Sunflower"
Becka Silva, Oroville, CA
becka_silva_sunflower_renee"All of my sunflower seeds are from Renee's garden. I am starting a small farming business and the sunflower was my inspiration for the name, Girasole Farm. Girasole is the Italian word for sunflower. Most all of my summer garden was was started with Renee's seeds. Everything from zucchini, carrots, corn (YUM), butternut squash, cucumbers, watermelon and cantaloupes. I grew some gourds last year which were featured on a local house/garden show."

amy_bond_Tricolor-zuc
 
Honorable Mention: “Lounging Tri-Color Zucchini
Amy Bond,
Chico, CA
“These two Tricolor Zucchini enjoyed some quality time by the lake before cooling off in a refreshing salad. When picked young, these zucchini have a soft yet crunchy texture and delicate taste that makes them the perfect addition atop your summer salad."


 Jan_Fetlercontest-SweetPeaHonorable Mention: “April in Paris" Sweet Pea
Jan Fetler,
Elk Grove, CA
“I am a gardener and a small-flock chicken farmer--both activities work well together.  Chickens will eat garden waste and their manure feeds the garden. Grown in a raised bed with a strong trellis, my sweet peas reached 6 feet and were covered with sweet fragrance.”
Jan_Fetlermonth8-sunflower


Jan's chickens devouring a sunflower. Jan's chicken website: The Poultry Project


Borage
Honorable Mention: “Blue Borage"
Shelley Cornell, Florida  

“I don't think I had one seed that didn't germinate and not only that, when the Florida heat virtually melted this beauty, there was a ton more to take its place from self seeding.  The beautiful pink and blue flowers that opened up on a plant covered in blue flowers. The other pic is of a bee on the Blue Borage, which is exactly why I wanted to grow it - I wanted to attract pollinators.”
Bee and Borage


Kid’s Garden Photo Contest Winner
Thomas and Amy Pelkey,
Harrisburg, Oregon
peas
“The boys each planted their own Renee's "Super Sugar Snap" which is their favorite "green" vegetable along with broccoli.  Thank you for the excellent Sugar Snap! It will be in our garden again this late summer/fall as well as an order for seeds next year.“

Tuesday, September 21, 2010

The Power of Flowers

By Jay Leshinsky, East Coast and Canadian Sales Manager

This is the time of year I summarize my summer working with the students at the Middlebury College Organic Garden where we trial varieties for Renee's Garden and grow produce for the College's dining system. Each summer's group of student interns has a different personality. This year, the group loved to make up and sing songs while they worked. Our garden has a close connection to work songs; six years ago Bennett Konesni, one of the student founders of the garden, won a Watson fellowship to study work songs all over the world (you can learn work songs at his farm, Sylvester Manor.

Many of the songs Bennett discovered were tied to agriculture and were created to make work more enjoyable, cohesive and collaborative. Following Bennett's lead, the garden often had interns who played music during work breaks, but this was the first time I worked with such consistent “on the job” singers. One song they created while thinning over-grown yarrow plants (sung with a pace similar to that used by old time railroad workers pounding stakes into the rails) was so memorable that the elementary school children visiting the garden that day all left singing the "yarrow" song as they walked back to town, even though no one had taught it to them.

Yarrow is one of the many plants we use to attract pollinators and beneficial insects to the garden. One of the most striking observations a student doing research made was that the yellow crookneck summer squash she grew inter-planted with catnip out produced a control group of the same variety by two to one! When I mentioned this to Renee, she told me she knew farmers who were planting very specific plants throughout their garden beds for beneficial insects (since that time we put together a Guide to Attracting Beneficial Insects.

The students decided to plant some perennials like catmint, catnip, Korean mint, yarrow, bee balm, echinops and centurea and began to experiment with planting of annual flowers. We also plant lots of zinnias (because they are great cutting flowers as well), alyssum, tithonia, nicotiana, nigella, cleome, asclepias, cosmos, calendula, Marble Arch salvia, poppies and sunflowers. We also let herbs like cilantro, dill, arugula, basil, borage, thyme and sage go to flower where they attract many beneficial insects (plus we wind up with a crop of coriander, the seed stage of cilantro).

For the past two years we also grown yellow sweet clover, the favorite food of our honey bees- we have 5 bee hives at the garden- as a “ green manure” crop, grown to enrich the soil. After the bees pollinated it we got a great crop of seed, mowed the clover and allowed it to reseed for the next year (when it bloomed again). We turned it in this spring for it nitrogen value (it is deep rooted and can be hard to turn in by hand) and got sensational crops of broccoli and cabbages in that part of the garden late this summer.

In my blog post last March, I mentioned the pollinator research done last fall at the garden by Professor Helen's Young's biology students. Three new students will come to the garden next week to do more research on the insects that visit our flowering plants in the fall. Visitors to the garden love strolling through to enjoy the flowers. The interns and I established a ritual of cutting our zinnias and bringing bouquets of these long lasting flowers (unannounced) to the offices on campus as gifts from the garden. It is so satisfying to see the smiling faces of the recipients of our flower surprises.

Wednesday, September 1, 2010

Mini Pumpkin Teepees

by Lindsay Del Carlo, Renee's Garden Trial Garden Manager

Everyone loves miniature “baby” pumpkins because they are extremely productive, easy to grow, fast to mature and lots of fun to have around for all the fall and winter holidays. This summer, we used a space saving method and made bamboo teepees for these vigorous vines to twine up. We found that growing miniature pumpkins up vertically in this fashion created a handsome and decorative focal point in the garden beds. In no time at all, the bamboo tripods were covered with an abundance of 4 to 5 inch little ribbed orange pumpkins that we will use for decorations with plenty to bake as tasty edible bowls for pumpkin pudding or savory soups or other fillings. Here’s how to make your pumpkin tepees with our “Mini Jack” baby pumpkin variety.
First sow groups of two-three seeds of Mini Jack Pumpkins in a triangle with 2 feet between each group. After the seeds have emerged and have several sets of leaves, thin to one strong seedling in each group so you have a triangle, as you see in the picture.


Second, put 2 bamboo poles per plant, one on each side of the seedling. Here we are using bamboo that is 8 ft. long and about an inch in diameter.


Place the poles so that they are standing perfectly upright. This makes it much easier to gather the poles at the top to tie.
Once the poles are all in place, gather them at the top and tie together with some garden twine.

Mini Jack plants will grow and twine up vigorously. Once they start to vine, tie each branch to the bamboo pole to train them upwards. Make sure to check them a few times a week, and continue to tie the branches to the poles. The plants do have tendrils that will cling to the poles and other branches, but by anchoring them with ties you will ensure sustainability on the pole as they will become heavy with many miniature pumpkins.
The little pumpkins will be creamy colored at first like those in this picture, but as they mature, they will turn bright orange. Harvest them by cutting them by the stem handle. Once cut, cure them for a week or 10 days in a sunny, dry spot and then store in a cool dry place. They’ll last for months.

Mini Jacks mature earlier than regular sized pumpkins, rewarding you with armfuls of deeply ribbed fruit that make welcome gifts, colorful edible decorations.

Wednesday, August 4, 2010

Summer (Finally!) in the NW Trial Garden - by Sue Shecket, webmaster

I love our Pacific NW “summer” with days in the 70s and cool nights in the 60s - it’s great for glorious flowers, lovely lettuce and my skin. But this June even we diehard Seattle mossbacks were miserable as it was the coldest and wettest in anyone’s memory. Once again my poor tomatoes – and just about everything else I started earlier – suffered from unrelenting rain, chill, and a lack of attention from a dispirited gardener. But finally on July 5, Mother Nature took pity on us and brought forth glorious sunny days and warm nights, so I ventured back into the garden to survey the damage.

The slugs absolutely adored their unhampered access to all of my seedlings, and mowed down most everything under a few inches tall. I counterattacked with nontoxic Sluggo, got direct vengeance with my trusty scissors, and sowed new seed. What was still up and growing was pretty anemic and hungry, so I applied a batch of our favorite organic fertilizer potion: 1 tablespoon liquid fish emulsion and 1 tablespoon liquid kelp per gallon of water. In short order, things improved dramatically and I’m no longer embarrassed to invite the neighbors over to help harvest my now bountiful supply of lettuces, peas, arugula, spinach, baby squash and more.

A dramatic demonstration of the advantages of starting vegetables from seed is seen in the squash planting. I sowed several squash seeds per mound and transplanted the extra plants to an adjacent bed below. The undisturbed plants in the upper bed are at least twice the size and vigor of the transplants.
Flowers are coming on late, but my deck containers are filling out with vibrant colors. Here’s one color from my favorite Salpiglossis mix, aptly named “Stained Glass”.

My re-seeded veggie beds not only caught up quickly, but have surpassed those planted earlier that were subjected to poor growing conditions. For once I am glad I procrastinated in getting much of the garden going this year.

One group of plants that loved that lousy June are my hillside of Hydrangeas - the lack of sun stimulated them to put on exceptionally luxuriant growth and extra large blooms. Others that unfortunately thrived are the perpetual bindweed and invasive buttercup – a NW gardener’s eternal enemies.


And that drip irrigation system that I vowed to install this spring – well, somehow we were just not inspired this year. But my trusty soaker hoses are hanging in there. And I promise that NEXT season, we’ll really do it… really.

Thursday, July 1, 2010

Creating My Edible Front Yard


- by Sarah Renfro, Renee's Garden Business Manager


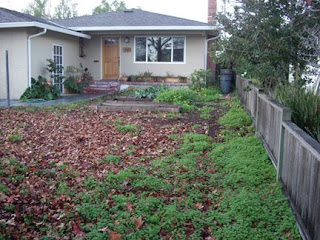
The front yard of my Santa Cruz, CA house (20 feet wide x 40 feet long) has been a neglected, patchy lawn with uninteresting shrubbery since we purchased it almost 7 years ago. Over the years, I made half-hearted attempts to beautify it by digging out old shrubs, demolishing a dated brick planter box and planting some annuals for splashes of color. Still there was no unifying design and my house certainly had no curb appeal.  Here's what it looked like:

Edible front yard landscaping at Renee's Garden
Edible front yard - a before picture
Last year’s summer drought and watering restrictions inspired me to start the transformation process. The first step was to smother the grass (and weeds) by laying down cardboard and covering it with a thick layer of bark mulch. I opted to let time do the hard work rather than try to remove the sod manually. In addition to the mulch, I gladly left all of the leaves that dropped from my Liquid Amber tree to add to the layer of decomposing organic material. I also built three (3x 10 ft.) raised beds in the spot that gets direct sun for the most of the day.

My first child (a boy named Mason) was born in November and I knew that my husband and I wouldn’t have the time needed to continue tackling the front yard landscaping this year.

Edible front yard landscaping at Renee's Garden
Mason!
It was time to call in the professionals. I contacted former Renee's Garden employee Joy Albright-Souza, (http://www.albrightsouza.com/) now a residential landscape designer, to create a plan. Her trained eye and thoughtful questions resulted in a design that incorporated our interest in using the front for growing food with an attractive, safe outdoor living area for our growing family.

Landscaping in progress
Now that we had a plan, we needed someone to execute it. Joy recommended Baxter Landscaping (http://www.baxter-landscaping.com/), who worked with us to break down the project into affordable phases. Owner Dave Baxter helped us determine the best value for our money and pointed out where we could save on materials or labor by doing some of the work ourselves.

Edible front yard landscaping at Renee's Garden
Watching through the front window, with my newborn in my arms, I was truly amazed at the speed and efficiency of the work crew. Within one day they had cleared the front and laid the pipes for the irrigation system. At the end of each day, it was fun to see the drastic changes that had taken place. Of course massive rain storms caused some delays but it did make the ground nice and wet for the new plants!

By early spring our front yard had been transformed. We now had three more raised beds in various sizes and shapes to complement the existing ones, an attractive fence to enclose our expanded garden and contain the dog (and kid), trellises on the front of the house, flagstone paths and best of all, a larger front porch with room to sit and enjoy our beautiful new view.

Time to get planting! My mom, webmaster Sue (and now Nana Sue), flew in from Seattle to help me get started. The permanent plants followed the edible theme - blueberries, citrus, artichoke, guava and passion fruit to name a few. Also drought-tolerant native grasses and herbs. Crops of early spring vegetables such as “Farmer’s Market” Lettuce, “Italian” Arugula, “Super Sugar Snap” Peas and “Easter Egg” Radishes completed the planting bonanza.

Front yard landscaping - after
Now it is early summer and we are enjoying the fruits (and veggies) of our labor. I’ve done multiple sowings of lettuce, arugula, radishes and carrots and my butterfly-attracting flowers - “Dancing Petticoats” Cosmos, “Persian Carpet” Zinnias and “Junior” Sunflowers - are starting to bloom. All of the beds are setup with drip irrigation – a true time and water saver! Instead of spending time hand watering every evening we are relaxing on our front porch, talking with our neighbors and marveling at the transformation that is taking place in our new edible front yard.

The fruits and veggies of Sarah's labor

Here’s a list of the Renee’s Garden varieties in our new garden:

Vegetables:
Lettuce “Farmer’s Market”                            
Squash “Summer Scallop Trio”  Radish, "Easter Egg"
Chard “Bright Lights”          Carrot, "King Midas"
Scallions “Delicious Duo”    Bean, "Edamame"
Peas “Super Sugar Snap”    Melons, "Three Flavor  Mix"
Watermelon “Rainbow Sherbet”    Squash, "Delicata & Butternut"
Gourds “Wings & Warts

Flowers:                                      Herbs:                           
Nasturtium “Creamsicle”          Arugula, "Italian"
Nasturtium, "Cherries Jubilee"  Alpine Strawberries,"Mignonette"
Cosmos “Dancing Petticoats”  Chives, "Fine Leaf
Sunflower “Junior”   
Zinnia “Persian Carpet
Related Posts Plugin for WordPress, Blogger...